Estimating for Netting Hardware
One of the keys to a successful bird netting installation is how well the netting is fastened. The following details will help you find the proper quantities of netting hardware needed based on your installation area dimensions.
NOTE: Each netting installation is different and some of the estimating guidelines may not apply to your application. If you have questions or need help, please
Contact Nixalite.
BEFORE YOU CONTINUE, make sure you have accurate measurements for the netting installation area. If you have not measured for your bird netting, go to
Planning Your Bird Netting Installation and use the guidelines to accurately measure for your netting installation. You will also need to know they type of netting hardware you want to use. If you are not sure,
Contact Nixalite.
It will be easier to keep track of the hardware you will need if you make a simple drawing of your netting installation area. Apply the dimensions you recorded and mark the locations where the netting hardware is needed.
Estimating for Poly Hardware
 |
PolyClips: for perimeter fastening.
-
Flat Surfaces: space 12” o.c. along flat perimeter.
-
Curved Surfaces: space 6” o.c. along curved perimeter.
-
Add 1 Poly Clip for each corner or change in netting direction.
|
|
|
|
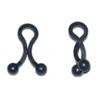 |
Twist Locks: Joining netting together at seams and cuts.
-
Overlap seams: space 6" o.c along seams. TIP: stagger along both sides of seam.
-
Cuts, patches, panels: space 3” o.c. along edges of any cut or patchwork.
|
|
|
|
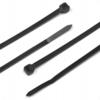 |
Net Ties: multi-purpose fastener, common applications listed below.
-
Overlap seams: space 6" o.c along seams. TIP: stagger along both sides of seam.
-
Cuts, patches, panels: space 3” o.c. along edges of any cut or patchwork.
-
Overhead support: space 12” o.c. along overhead support (pipes, cables, etc).
|
|
|
|
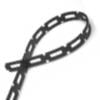 |
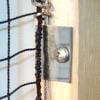
Quick Tie Chains: overhead support.
-
Overhead support: space 12” o.c. along overhead support (pipes, cables, etc).
|
|
|
|
 |
Poly Cord: multi-purpose fastener, common applications listed below.
-
Overlap seams: Weave the cord in and out of the netting on both sides of seam.
-
Overhead support: space 12" o.c. along overhead support.
-
Not for perimeter support!
|
|
|
|
Estimating for Tensioned Cable Hardware
 |
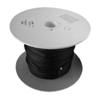
Net Cable: Spool yield is always less than capacity due to cable used in loop connections.
-
Estimate for full 250' or 500' net cable spools.
-
A 250 foot spool should yield about 240’ of cable installation.
-
A 500 foot spool should yield about 480’ of cable installation.
-
TIP: don't forget to include cable footage for support cables (if needed).
|
|
|
|
 |
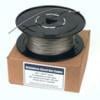
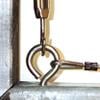
Loop Connection Hardware: items used to fasten the cable to the corner hardware and turnbuckles.
-
Ferrules: (optional) 2 each. For cable runs from 0 to 25’ long.
-
NOTE: The LOCOLock Ratchet Crimper is required for ferrule installation.
-
Wire Rope Clamps: (recommended) 2 each. Optional for cable runs from 0 to 25' long. REQUIRED for cable runs over 25’ long.
-
Thimbles: 1 per connection. Recommended for ferrule connections. REQUIRED for wire rope clamp connections.
|
|
|
|
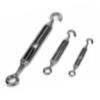 |
Turnbuckles: always use one turnbuckle per run of cable. Never go around corners without adding a turnbuckle.
-
Small turnbuckles: 25’.
-
Medium turnbuckles: 50’.
-
Large turnbuckles are available. Custom hardware may be needed - call for info.
|
|
|
|
 |
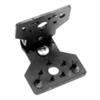
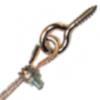
Corner Hardware: anchors the cable installation to the surface. Supports the entire weight of the netting installation.
Maximum Spacing: 50'
-
Use 1 at each corner and for each change in direction of the cable installation.
-
Use 1 at all cable breaks (where the cable stops and starts again).
-
Add 2 for each support cable (one at each end).
|
|
|
|
 |
Cable Guide Hardware: Installed between the corner hardware to keeps the net cable close to surface.
-
Straight cable runs: every 24".
-
Curved cable runs: every 12”.
|
|
|
|
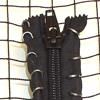 |
Net Rings: fastens the netting to the cable, zippers to the netting and seals up netting seams.
-
Cable to netting: 16 rings per foot (1 ring per mesh for 3/4” net).
-
Sealing overlap seams: 32 rings per foot (16 rings / foot on both sides of seam).
-
Installing 2 foot zippers: 64 rings (32 rings each side of zipper).
-
Installing 4 foot zippers: 128 rings (64 rings each side of zipper).
-
Installing 8 foot zippers: 264 rings (128 rings each side of zipper).
|
Let Nixalite of America Inc help you plan your netting installation!
If you provide detailed information about your bird netting application, Nixalite will recommend a netting system and provide a material quotation. It is critical that your information is accurate and complete.