Installing FliteLine® Post & Wire
Nixalite provides you with the best post and wire system available. We want you to get the best from the best, please review all of the available information and plan your installation with care. Follow the guidelines provided for planning and estimating to make sure you have the best installation for your deterrent system.
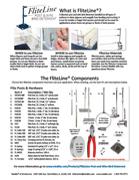 |
The FlitePlan - The Complete FliteLine Brochure
This FliteLine Brochure has step-by-step planning guidelines you will need for your FliteLine installation. This brochure also contains estimating tools and step-by-step installation instructions. |
Basic Installation Outline.
This outline shows the basic procedures for installing your FliteLine system.
 |
Clean the surface. Clean the surface thoroughly before installation. The surface must be clean, dry and free of debris before you begin your installation. |
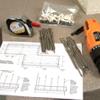 |
Get everything together before you start. You will need all of your FliteLine items, a straightedge (or chalk snap line), a tape measure, a marker or pencil and a copy of the FliteLine brochure for reference. You might also need a drill, drill bits, a hammer and a self-drawn dimensioned sketch of your installation. |
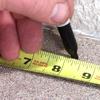 |
Mark the surface. Using the information you found by using the FlitePlan planning guides, mark the FliteLine row and post locations on the surface. |
Install the Flite Posts. Use the Hardware Steps provided below or download the
FliteLine brochure. Make sure the posts are facing the right direction.
-
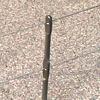
Masonry: Drill a 1/4" diameter hole, 1-1/8" deep. Insert anchor and seat the Nail Point Flite Posts with a hammer. The installed height should be 3.5" (8.9cm) for the short posts and 5" (12.7cm) for the tall posts.
-
Wood: To prevent splitting, drill a small pilot hole 1" deep. Seat the Nail Point Flite Posts with a hammer. The installed height should be 3.5" (8.9cm) for the short posts and 5" (12.7cm) for the tall posts.
-
Sheet metal: Position the Flite Post with base (Flite Base) over the post location and mark the mounting holes in the base. Drill small pilot holes on the marks, then secure the Flite Post with at least 2 stainless steel sheet metal screws.
-
Adhesive: Use mechanical fasteners whenever possible. If you must use adhesive, always read, understand and follow the surface preparation and application instructions provided on the adhesive packaging. Apply adhesive to the surface AND to the bottom of the Flite Post with base (Flite Base). Push the two surfaces together so the adhesive squeezes through the holes of the base. The adhesive must be allowed to fully cure before attaching cables and springs to the posts.
Make all cable connections. All of the FliteLine cable connections are simple loop connections.
 |
Cable to post: Slide a ferrule onto the cable, loop the cable through a post eyelet and back through the ferrule. Push the ferrule to the post while pulling the cable tight. Crimp the ferrule with the Crimp Tool and trim the excess cable. |
 |
Support post: pass the cable through a post eyelet and continue on to the next post. |
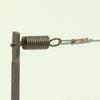 |
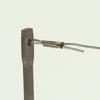
Cable to spring: Insert a spring through a post eyelet. Slide a ferrule onto the cable, loop the cable through the spring eyelet and back through the ferrule. Push the ferrule to the spring while pulling the tag end of the cable tight. Tension the cable so the cable is straight but the spring is not extended. Crimp the ferrule and trim the excess cable. Stagger spring connections - do not install 2 springs on 1 post. |
Finishing touches. Install upper and lower cables at all outside edges. Inspect finished installation for straight cable runs, evenly spaced rows, etc.