Nixalite® Climbing barriers on Square Objects
These guidelines provide the basic steps for installing a climbing animal barrier on a vertical,
square or rectangular post. These steps are for a typical installation - your application may be different and may require different or additional steps. If you have any questions,
Contact Nixalite.
For a hardcopy of these instructions, download
Climbing Barrier on Square Objects .
Installing on Square objects:
NOTE: Do not use Blunt Tip Nixalite models for climbing animal barriers.
Where to start. Always begin the barrier installation at the top where the post ends or meets the object it supports (example; where it meets a bird house, the bottom of a deck or other framing).
Do You Have Enough Space? A typical six row climbing barrier takes up about 2-1/2 ft (76 cm). We recommend that the bottom row is at least 5 ft (152 cm) off the ground. So, you should have 7-1/2 ft (228 cm) of uninterrupted, vertical space to install the ideal climbing barrier. If not,
Contact Nixalite for alternatives.
Accurately measure and record the width of each side of the post.
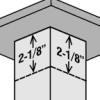 |
At the top of the post, measure down 2-1/8 inches (5.4 cm) and draw a level line around each side of the post. |
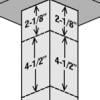 |
From the line just drawn, measure down 4-1/2 inches (11.4 cm) and draw another line around the perimeter of the post. Repeat this step 4 more times until you have 6 individual lines spaced 4-1/2 inches (11.4 cm) apart. |
Use the hardware spacing information below to find the quantity and spacing of mounting hardware units for each side of the post. To find the hardware that best suits your application, go to the
Mounting Hardware page.
Mounting Hardware Spacing for Square Posts
The quantity and spacing of the mounting hardware depends on the width of each side of the post. Never use less than 2 units of hardware per side.
|
Width of EACH SIDE (inches/cm) |
Hardware qty & spacing on EACH SIDE of post |
|
0” – 16" (0 - 40.6 cm) |
2 units - one at each end (never less than 2 units) |
|
16” – 24" (40.6 – 61.0 cm) |
3 units - one at each end, one in the middle |
|
24" – 36” (61.0 – 91.4 cm) |
4 units - one at each end, two spaced evenly between |
|
36” – 48” (91.4 – 122.0 cm) |
6 units - one at each end, four spaced evenly between |
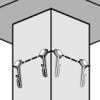 |
Along each line, mark where the hardware will be installed on each side of the post. Install the mounting hardware with the hook end of the mounting clip pointing towards the ground. |
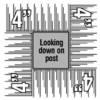 |
IMPORTANT!! When cutting the Nixalite strips to fit each side, leave the strip 4 inches longer (10.1 cm) than the length of each side. This is very important! Each strip of Nixalite must extend 4” (10.1 cm) past the outside corner. Without this overlap, there will be a “V” shaped gap at each outside corner that a climbing animal could use to get through the barrier. Switch the direction of each row so the corner overlaps are staggered. Pull the Nixalite strips into the mounting clips. Repeat for each row. |
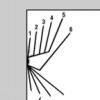 |
The top row of Model W Nixalite is installed with the 6 wire side facing up, toward the top of the pole. The bottom row of Model W Nixalite is installed with the 6 wire side facing down towards the ground (opposite of top). |